My Palm-Sized Homelab: Docker, Traefik & Self-Hosted Services 🚀🏡

Introduction 🌟
Imagine having half a dozen websites and apps – a personal portfolio, a blog, a store, even your cloud storage – all running from a palm-sized computer in your home. Sounds like sci-fi, but that's exactly what I've built! 😄 In this article, I’ll share the architecture and philosophy behind my homelab setup. It’s a tiny Intel 4-core Linux box (8 GB RAM, 512 GB SSD + external SSDs) running Ubuntu 24.04 – literally small enough to hold in one hand – yet it hosts multiple web services accessible worldwide. How? By containerizing everything with Docker and Docker Compose, and using Traefik as a smart reverse proxy to route traffic for different domains. All traffic comes through a single entry point (my home’s internet connection) and is directed to the right service based on the requested domain name. It’s like having my own mini data center at home, configured with a mix of casual tinkering and professional best practices. 🤓
Why go through the trouble of self-hosting? For me, it’s about learning, control, and fun. Running your servers teaches you a ton about how web services work under the hood. I also love that I own my data and am not relying on third-party cloud providers. This homelab reflects an ethos of digital independence: as the Nextcloud project puts it, “privacy is a right… and your own, private Nextcloud server is the best way to get started with getting it back”. In short, it’s empowering (and pretty cool 😎) to run your services on hardware you control. Throughout this article, I'll explain the key components of this setup – containerization, Docker Compose, Traefik, dynamic DNS with No-IP, and some lightweight network configuration – all in a friendly, beginner-friendly tone. By the end, you'll see how you too can turn a tiny PC into a powerhouse homelab hosting multiple applications. Let’s dive in!
Architecture Overview 🏗️
Before we get into the nitty-gritty, let’s get a high-level view of how everything connects. Here’s the basic journey of a user request in my homelab:
- Domain Name & Dynamic DNS: A user on the internet enters one of my service URLs (for example,
https://subroto.sanyal.netfor my homepage). This domain is registered and managed through a dynamic DNS service (No-IP), which keeps it updated with my home’s current IP address. So, the browser finds its way to my home network via this domain name (even if my ISP changes my IP). - Internet to Router: The request travels across the internet and reaches my home’s router (the gateway device for my local network). I’ve configured the router to port forward incoming web traffic (ports 80 for HTTP and 443 for HTTPS) to my little Linux server on the LAN. This way, the router knows to send any web requests to the homelab box.
- Traefik Reverse Proxy: The Linux box receives the traffic, which is first handled by Traefik, a reverse proxy container that I run as the front door to all my services. Traefik looks at the requested Host (the subdomain in the URL) and decides which internal service’s container should get this request. For example, a request
brainbrew.sanyal.netwill be routed to the Ghost blog container, whilestorage.sanyal.netgoes to the Nextcloud container. Traefik acts like a smart traffic cop 🚦, directing each request to the correct service based on rules I’ve defined (and doing it dynamically, so if I add or remove a service container, Traefik auto-updates its routing). It also handles HTTPS by automatically providing TLS certificates (thanks to Let’s Encrypt integration). - Service Container: Finally, the request reaches the appropriate Docker container running the actual web service (portfolio site, blog, etc.). The service generates a response (such as an HTML page or file) and sends it back to the client. Traefik takes that response and forwards it back to the user’s browser over a secure HTTPS connection.
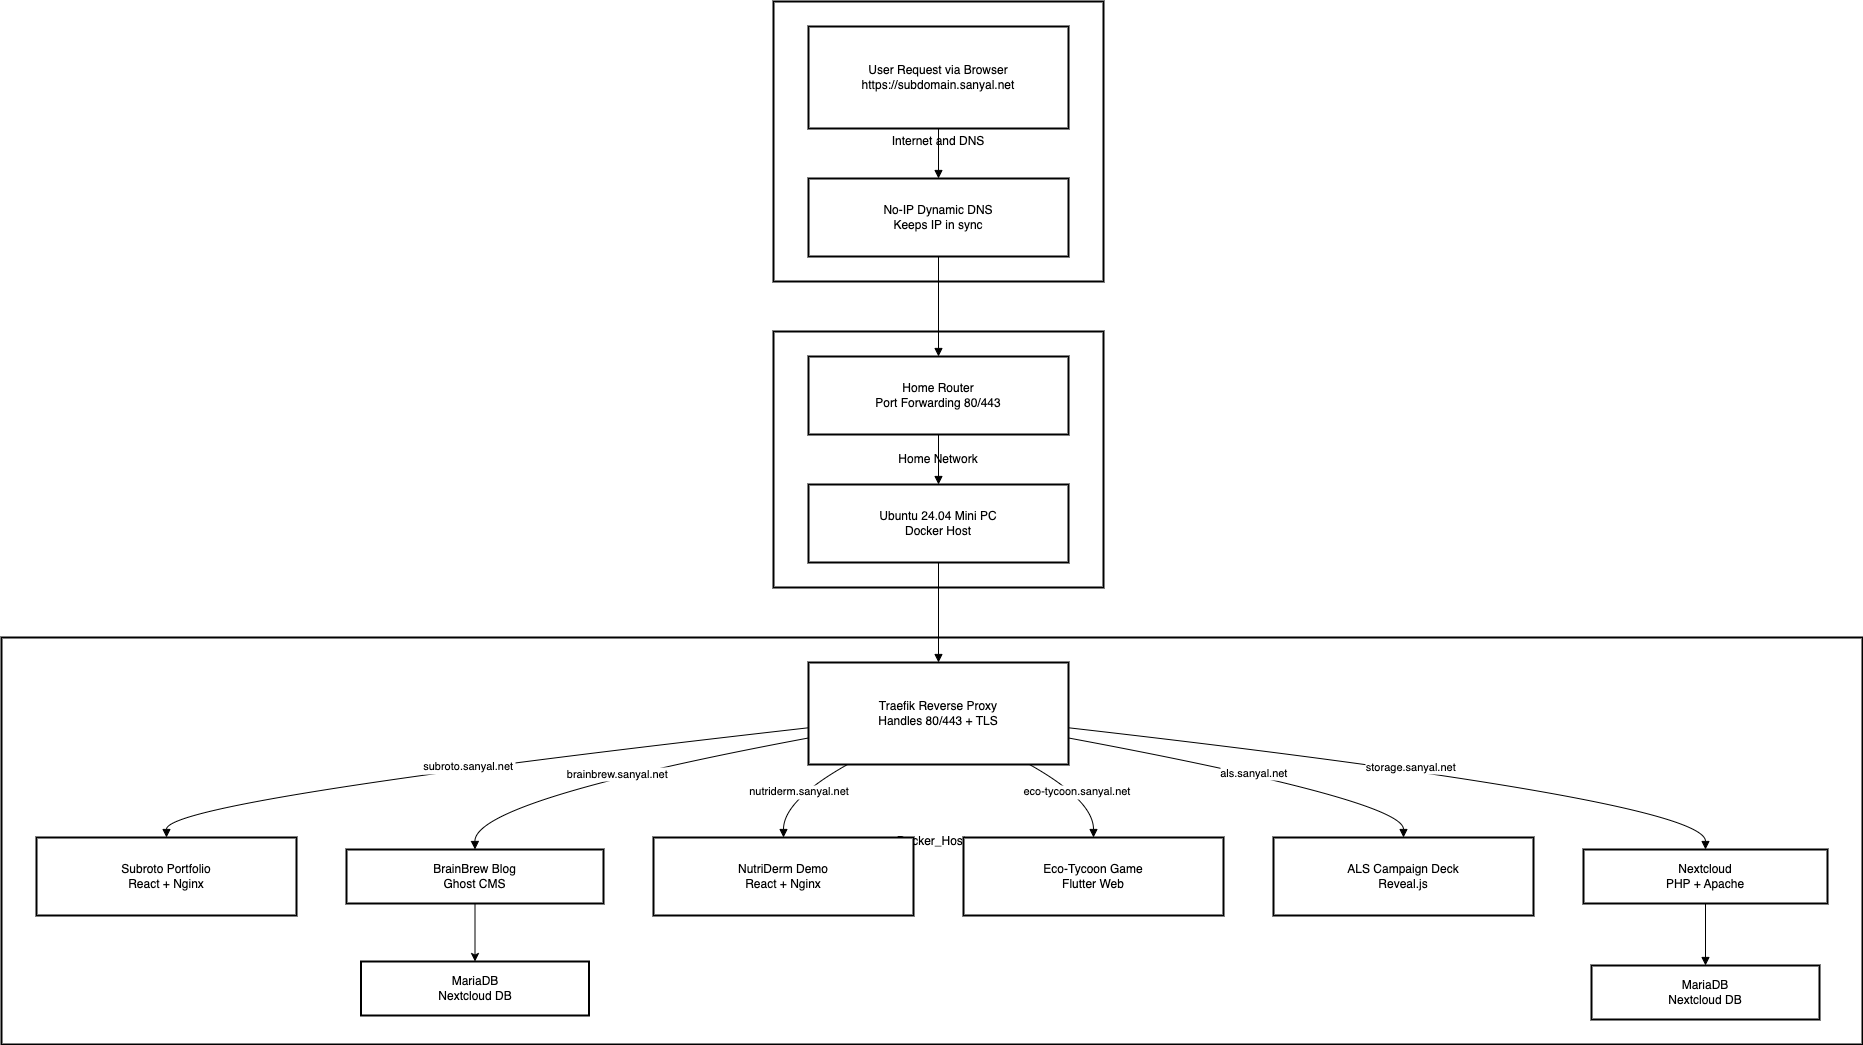
In summary, a single mini-server is running multiple isolated services. All external requests come in on the same IP/ports and hit Traefik, which then “switchboards” the traffic to the right container based on the domain name. This means I only expose minimal ports to the internet (just 80/443), and I don’t need a bunch of public IPs or separate machines for each service. It’s efficient and elegant – everything is neatly containerized and accessible through subdomains.
Now that you see the big picture (above), we’ll break down each piece of this architecture: the hardware, containerization with Docker Compose, Traefik as the reverse proxy, the dynamic DNS setup with No-IP, and the router configuration. Finally, I’ll showcase the six services running on this box – each with its own story and tech stack. Let’s start with the foundation: the hardware and OS that make this homelab possible.
The Tiny Hardware Behind the Homelab 🔌🖥️
One of the coolest aspects of this homelab is the hardware – it’s small but mighty. I’m using a palm-sized mini PC (think Intel NUC or similar form-factor). Don’t let the size fool you: it packs a 4-core Intel CPU and 8 GB of RAM, plus fast SSD storage (up to 512 GB). This is roughly the power of a mid-range laptop, which is plenty for a handful of web services, especially when they’re optimized with lightweight tech (more on that soon). The device runs Ubuntu 24.04 LTS (Long Term Support), a cutting-edge yet stable Linux release. Ubuntu provides a reliable, familiar base environment, and its great hardware support meant I had no issues getting the mini PC up and running. I chose Ubuntu because of its large community and easy package management – perfect for a project that might involve a variety of software (compilers, databases, etc., all of which Ubuntu handles with ease).
Running a homelab on a mini PC has a few awesome benefits:
- 🌱 Low Power Consumption: Unlike a power-hungry server, this tiny box sips electricity. It can run 24/7 without making a dent in my power bill (or heating up the room). That makes it feasible to host services continuously at home.
- 🤫 Quiet and Compact: There’s no loud server rack or bulky tower. The unit is small enough to sit on a bookshelf, and it’s very quiet (solid-state storage and efficient cooling mean it’s near-silent). This is home-lab after all – I don’t want to live with a jet engine in the office!
- Sufficient Performance: For personal workloads, 4 CPU cores and 8 GB RAM go a long way. None of my web services are super heavy – they’re mostly low-traffic or for personal use. I can comfortably run a database, a few Node/JavaScript apps, and a cloud storage server concurrently. Linux is pretty efficient with resources, and Docker adds only a tiny overhead for each container. In practice, I rarely see the CPU or RAM maxed out. The SSD ensures quick I/O, so things stay snappy. If needed, I can even expand the RAM or add an external drive thanks to the flexibility of PC hardware.
- Cost-Effective Experimentation: I got this mini PC at a reasonable price. Compared to renting cloud servers for each service, running my hardware pays off over time. Plus, I can spin up or down as many containers as the hardware can handle with zero extra cost – great for experimenting with new apps. (Of course, I keep backups and understand that home hardware can fail, so truly critical data is also backed up elsewhere.)
The Ubuntu 24.04 OS is configured minimally – essentially, the server does one main thing: run Docker. I don’t install a ton of software directly on the host; instead, each application lives in its own container. This keeps the base system clean and reduces maintenance. Ubuntu’s stability means I get security updates regularly. And since it’s an LTS release, I’ll have support for several years, which is comforting for an always-on server.
In short, the hardware and OS provide a solid, no-nonsense platform. Think of it as a blank canvas on which Docker will paint all my services. Now, let’s talk about the strategy that makes managing multiple applications on this modest box not only possible but downright convenient: containerization.
Why Containerize Everything? 🐳
When you’re running several different applications on one machine, you could theoretically install them all directly on the OS… but that would get messy fast. Conflicting dependencies, complex setup steps, and difficulty in resource isolation are just a few problems. Enter containers: a way to package each application along with its environment so they don’t interfere with each other. I decided early on that everything in my homelab would run in Docker containers – an approach that has paid off immensely.
What is a container? In simple terms, a container is like a lightweight mini-computer or isolated sandbox for an app. It includes the application and all its dependencies (libraries, runtime, etc.), but it shares the host system’s kernel. This makes containers much more efficient than full virtual machines – they use far less RAM/CPU overhead and start up in seconds. A commonly cited definition is: “A Docker container is a lightweight, standalone, executable package of software that includes everything needed to run an application”. Unlike a traditional app installation, a container won’t clutter the host with random packages; everything it needs is inside the container image. Containers give consistency (it runs the same on my machine or yours) and portability (I can move or copy a container to another server easily).
In my homelab, each service runs in its own Docker container, which provides several benefits:
- Isolation: Each app thinks it has the machine to itself. For example, my Ghost blog container can run Node.js 18, and my Nextcloud container can run PHP, and they don’t even know about each other. There’s no chance of version conflicts or one app’s library upgrade breaking another. This isolation also improves security – containers have restricted access to the host by default.
- Easy Deployment: Setting up a new service is as simple as pulling a Docker image and running it. No need to manually install languages or frameworks on Ubuntu. If I want to try a new tool, I can often just run it in a container temporarily. Cleanup is easy, too – removing a container leaves no trace in the system. This encourages experimentation without fear of “messing up” the server.
- Resource Control: Docker allows me to set memory or CPU limits if needed, ensuring one runaway service doesn’t hog everything. While I haven’t had to throttle anything yet (the loads are light), it’s good to know I have that fine-grained control. Also, by containerizing, I implicitly encourage apps to be efficient – for instance, I might choose a leaner base image for an app to keep its footprint small.
- Consistency & Updates: I define exactly what version of each application I’m running (via the Docker image tags). If I need to update Ghost or Nextcloud, I just pull a new image and restart that container. Rolling back is just as easy (use the previous image). This is much cleaner than a manual software upgrade on the host. And because each container is isolated, I can update one service at a time with minimal downtime and no impact on others.
To draw an analogy: If my homelab is an apartment building, Docker containers are like individual apartments for each service. They share the same building infrastructure (the OS kernel, hardware), but each is self-contained with its furnishings (software stack). They can’t trample on each other’s space, and if one tenant moves out (I remove a container), the apartment (system) is ready to accept a new tenant without leftover junk.
It’s worth noting that containers, especially Docker containers, have become a staple in both industry and hobby projects due to these advantages. They strike a balance between the isolation of virtual machines and the efficiency of running directly on the host. “Containers are similar to virtual machines, but use fewer resources and are faster to start up” – perfect for a nimble homelab where I might reboot or redeploy services frequently.
Now that we know why I used containers, let’s talk about how I manage them. With half a dozen services (and some supporting containers like databases) to coordinate, I needed a tool to keep track of everything. That’s where Docker Compose comes in.
Introducing Docker Compose: One YAML to Rule Them All 📝
Docker by itself is great for running single containers, but when you have multiple services that work together (or just co-exist), manually running docker run for each becomes unwieldy. Docker Compose solves this by letting you define a multi-container setup in one file and manage it as a single unit. In my homelab, Docker Compose is the glue that ties all my containers together and makes the environment reproducible.
In essence, “Docker Compose is a tool designed for defining and orchestrating multi-container Docker applications through a single YAML configuration file.” Instead of remembering a bunch of commands, I have a docker-compose.yml file that lists out all my services, their settings, and how they network with each other. With that in place, bringing up the entire stack is as simple as running docker compose up -d (which starts everything in the background).
Here are some key aspects of how I use Docker Compose in this project:
- Single YAML File: The compose file declares each service (web apps, database, proxy, etc.), what image to use, what ports to expose (if any), volumes for persistent data, and environment variables (like config settings, passwords, etc.). This single file is like a blueprint of my homelab. It’s under version control, so I can track changes or revert if something goes wrong. Compose makes it easy to see “all application services and dependencies in one YAML file,” bringing consistency and reducing mistakesdatacamp.com.
- Networking Made Easy: Compose by default creates a dedicated virtual network for the containers, so they can talk to each other by name. For example, my Nextcloud container can reach its database container by using the hostname “db” (as defined in the compose). Traefik can reach other containers by their names as well. I didn’t have to manually configure networking or figure out IP addresses – Compose set up an isolated network where all my services reside. This network isolation means internal traffic doesn’t spill out to my home LAN; only Traefik (which I explicitly publish on ports 80/443) is exposed.
- Volumes for Data: For any service that needs to save data (like the Ghost blog content, Nextcloud files, or databases), I use Docker volumes or bind mounts. In the compose file, I specify these so that data persists on the host’s SSD outside of the container’s ephemeral storage. This way, I can destroy or upgrade containers without losing data. Compose helps manage these volumes and reattaches them when containers restart, for instance, my Nextcloud’s files volume and database volume are always mounted in the right place when I bring the stack up.
- Environment & Config: Compose lets me centralize the config. I have a
.envfile and environment section, where needed. For example, I set the Ghost blog’s URL, database credentials for Nextcloud, etc., via environment variables in the YAML. This keeps secrets out of the image and easily changeable. If I wanted to move the setup to a new domain or change a password, I’d just edit the compose file or env file and redeploy. - Dependencies and Order: In Compose, I can indicate if one service depends on another. For example, ensure the database starts before the app tries to use it. Docker Compose will wait for the dependency to be (somewhat) ready. While I still use a bit of retry logic for critical services, Compose has never really let me down in starting everything in a sane sequence.
- One-Command Management: Perhaps the best part is how simple daily operation becomes. Need to update services?
docker compose pull(get new images) anddocker compose up -dwill seamlessly update containers one by one. Need to stop everything?docker compose down. Want to view logs across services?docker compose logs -fwill tail them all, helpfully prefixed by service name. This beats juggling multiple systemd services or screen sessions. It’s a single cohesive stack despite being many moving parts under the hood.
Overall, Docker Compose turns my collection of containers into essentially one application from the deployment perspective. It’s “infrastructure as code” at the homelab scale. This not only makes my life easier, but also means I could share this setup or replicate it on another machine with minimal effort – the YAML file is all one needs (plus maybe .env with secrets). No wonder Compose is recommended for “smaller production environments” like mine, as well as development and testing. It hits the sweet spot without the complexity of heavier orchestration (Kubernetes would be overkill here).
At this point, we have our hardware, OS, container runtime, and Compose to define our services. Next up is a crucial piece of the puzzle: how do all these services share a single network interface and ports? How do we host multiple websites on one box, all listening on port 80/443? The answer is a dedicated reverse proxy – Traefik – which we’ll dive into now.
Traefik: The Traffic Cop for Containers 🚦
With multiple web services living on the same machine, we need a way to route incoming requests to the right service. This is what a reverse proxy does – it’s like a dispatcher that stands in front of your services, all of which are hidden behind it. Several options exist (Nginx, Apache, Caddy, HAProxy, etc.), but I chose Traefik for my homelab because it’s built from the ground up for dynamic environments and container integration. Traefik has been a fantastic “middleman” that publishes all my apps under one umbrella while keeping things secure and simple.
What is Traefik? Traefik is often described as a “modern HTTP reverse proxy and load balancer that makes deploying microservices easy”. In plainer terms, Traefik is a small service that listens for incoming HTTP/HTTPS requests (on ports 80/443) and forwards them to the appropriate backend service based on rules. Those rules can be domain-based (e.g., Host header), URL path-based, etc. In my setup, I mostly use domain (Host) rules – each service has its subdomain. Traefik’s job is to examine each request and say, “Oh, this is for nutriderm.sanyal.netI will send it to the NutriDerm container on port XYZ internally.” It’s essentially the switchboard operator connecting callers to the right lines.
Traefik truly shines in a containerized setup because it can dynamically discover services. I configured Traefik to watch Docker events, so whenever I spin up a new container with the appropriate labels, Traefik automatically starts routing for it. Each of my app containers is listening on an internal port (say 3000 for the Node apps, 2368 for Ghost, 443 for Nextcloud internally, etc.), and Traefik receives all external traffic and then passes it to the right internal port based on the request’s hostname.
Here’s how I set up Traefik in my Docker Compose file and how it works in practice:
- Docker Provider & Labels: Traefik runs as a Docker container itself, with access to the Docker API (I mount the Docker socket into it). This lets Traefik see what other containers are running. I attach special labels to each service container that needs exposure. For example, my Ghost blog service has labels like:
traefik.http.routers.blog.rule=Host("brainbrew.sanyal.net")(for Let’s Encrypt)
traefik.http.routers.blog.entrypoints=websecure
traefik.http.routers.blog.tls.certresolver=myresolver
These labels tell Traefik: “Route requests with Host=brainbrew.sanyal.net to this container, and use TLS.” I repeat similar labels for each service (with its own Host). When Docker Compose brings up these containers, Traefik automatically reads these labels and creates routes. No manual editing of Traefik config files needed! If I remove a service, Traefik sees it gone and drops the route. This dynamic behavior is a key reason I chose Traefik over something like Nginx – it’s very hands-off after initial setup. - Entrypoint for 80/443: I configured Traefik with two entrypoints – one for HTTP (port 80) and one for HTTPS (port 443). In Compose, I map the host’s 80 and 443 to Traefik. So Traefik is literally the only container listening on the server’s public interface. All other app containers listen on the Docker network only. This means from the outside world, my server only has ports 80 and 443 open, making it simpler to secure. I love this benefit: I don’t have to expose, say, Nextcloud’s port or Ghost’s port directly. Traefik handles it all behind one front door.
- Automatic HTTPS (Let’s Encrypt): Traefik has built-in integration with Let’s Encrypt for free SSL certificates. I enabled this with a few lines of config (specifying an ACME email and a file to store certificates). Now, whenever Traefik sees a new domain (from those labels) it hasn’t got a cert for, it will automatically request one from Let’s Encrypt and keep it renewed. As a result, all my services are accessible via https:// URLs with valid certs – I didn’t have to obtain or install certificates manually for each subdomain. This is fantastic for security because it means encrypted traffic end-to-end. Traefik even handles redirecting HTTP to HTTPS for me, so users (and I) always get the secure version. In logs, I can see when it successfully renews certs every couple of months.
- Middleware and Other Features: Traefik can do a lot more (like middleware for auth, rate limiting, etc.). In my case, I use a couple of simple middlewares: one to redirect all HTTP to HTTPS, and another to add security headers. These were also configured via labels on a dummy “middleware” container or in Traefik’s static config. It’s nice to know I can extend with things like basic auth if I wanted to password-protect a service – Traefik supports that too. But by and large, my needs are basic: hostname routing and TLS, which Traefik handles gracefully.
- Dashboard: Traefik has an optional web dashboard to see all the routes and services it knows about. I have this enabled but protected with a password. It’s quite satisfying to open it and visually verify “Ah, Traefik knows about subroto.sanyal.net -> points to container X, etc.” It also shows certificate info. This is not necessary for operation, but as a homelabber, I enjoy having a GUI to check on the proxy status.
In summary, Traefik acts as the front door and traffic controller for my homelab. It receives all incoming requests and, based on the requested domain (or sometimes URL path), it routes them to the correct Docker container on the backend. It simplifies multi-service hosting – rather than juggling multiple ports and IPs, I have a single point of entry. Traefik’s tight Docker integration and automatic certificate management set it apart. It’s made for scenarios like this, where services might come and go, and where using hostnames for everything is preferable. I like to think of Traefik as the heart of the setup, pumping requests to where they need to go.
With Traefik in place, my services are ready to be accessed from the outside world. But there’s a catch: how do people (or I, when not at home) reach my home network in the first place? Home internet connections usually have dynamic IPs and sit behind routers. This is where the concepts of Dynamic DNS and port forwarding come in. Let’s look at how I configured those to make *.sanyal.net point to my homelab.
Domain & Dynamic DNS with No-IP 🌐🕸️
One of the goals of my homelab was to have nice, memorable URLs for my services (instead of an IP address and random ports). I also wanted to use my custom domain (sanyal.net and subdomains) to access everything. However, hosting a domain from home comes with two challenges: dynamic IPs and DNS configuration. ISPs often change your home IP address periodically (unless you pay for a static IP), and typical DNS records don’t update themselves automatically. Dynamic DNS services solve this problem. I chose No-IP – a popular dynamic DNS provider – to keep my domain in sync with my home’s changing IP.
How Dynamic DNS Works
Dynamic DNS (DDNS) is essentially a mechanism to programmatically update a DNS record when your IP changes. Normally, you might map sanyal.net to 123.45.67.89 (an IP), but if tomorrow that IP changes to 123.45.67.92, your site breaks unless you update the DNS. No-IP provides a Dynamic Update Client (DUC) that runs on a machine in your network (in my case, the homelab server itself) and periodically checks for IP changes. If it detects that the external IP has changed, it contacts No-IP’s service and updates the DNS record for my hostname(s) to the new IP. This happens in the background automatically, so the domain keeps pointing to the right place.
As the No-IP team describes it, “Our DUC continually checks for IP address changes in the background and automatically updates the DNS at No-IP whenever it changes… As long as the DUC is running and configured correctly, it will update your hostname with your current IP address.”. In other words, once set up, I can forget about it and know that sanyal.net will always resolve to my home’s IP (whatever that may be this week). In my setup, I run the No-IP DUC as a simple service/agent on Ubuntu. It’s configured with my No-IP account credentials and the hostnames to update. The agent checks my network’s public IP every 5 minutes and updates if needed. The update itself is quick (a simple API call to No-IP), and DNS propagation is near instant for their domains, so downtime due to IP change is minimal (I haven’t noticed any actually).
No-IP offers free subdomains (like something.no-ip.org), but I wanted to use my own domain sanyal.net. No-IP supports custom domains if you use their paid Plus service or if you delegate your domain’s DNS to them. In my case, I have a No-IP “Plus” account, which lets me create DNS records under my domain and update them via the DUC. So I created records for all my subdomains (subroto, brainbrew, nutriderm, etc., all CNAMEs or A records pointing to my root, depending on setup). The DUC updates the root A record (and could update others if needed). This way *.sanyal.net always hits home. If you’re on a budget or testing, the free No-IP subdomain would work just as well – you’d just use their provided domain name. But since I already owned sanyal.net, it’s great that I can use it dynamically (it makes the URLs look professional and personalized).
A quick note on router compatibility: Some home routers support dynamic DNS updates themselves. If so, you could enter your No-IP details into the router and skip running a client on a PC. My router didn’t support No-IP out of the box (many only support a few providers or the manufacturer’s service), which is why the Linux client is running. Either approach is fine – the goal is the same. (For those curious, No-IP’s client uses very few resources – a tiny daemon running – and it uses secure connections.)
Configuring No-IP on Ubuntu
Setting up No-IP’s DUC on Ubuntu was straightforward. I downloaded the client from No-IP’s site (they provide a tarball or APT repo). After installation, I ran a configuration script where I entered my No-IP account email, password, and chose the hostnames to update. Now the client knows “update sanyal.net with this machine’s IP”. I also set it to run at startup (No-IP provides instructions for setting it as a system service). Once that was done, I tested it by forcing an update and checking the No-IP dashboard to see if the IP changed accordingly. It did. 🎉
From then on, the process is invisible. Every 5 minutes, the client checks the current IP; if it’s different from the last update, it sends the new one. No-IP also has a “heartbeat” requirement: even if the IP doesn’t change, they need a periodic confirmation to keep the hostname active (for free accounts, it’s every 30 days via email confirmation; for paid, the client does it). This is handled by the client’s periodic check-ins. The No-IP logs (on my system) show entries of “IP hasn’t changed” or “IP changed to X, update successful” as appropriate.
So to summarize: No-IP dynamic DNS ensures that sanyal.net always resolves to my home’s current IP. This is crucial for reaching Traefik (and thus all the services) from the internet. Next, we’ll see how the home network is configured to accept those incoming connections and forward them to the server.
Minimal Router Configuration: Port Forwarding 🚪
Having the domain point to your IP is one part of the equation; the other part is allowing the traffic through your home router to your server. Most home setups are behind a NAT router (your Wi-Fi router or ISP-provided modem/router). By default, that router will block incoming requests or not know which internal device to send them to. That’s where port forwarding comes in. I configured my router to forward the standard web ports to my homelab box, enabling outside access for web services.
Port forwarding is essentially telling the router: “When a request comes in on port X, send it to this inside IP on port Y.” In my case, I set up two primary rules:
- HTTP (port 80) -> Homelab IP port 80
- HTTPS (port 443) -> Homelab IP port 443
Both rules point to the internal IP of my Ubuntu server (for example, 192.168.1.50). I gave my server either a static IP or a DHCP reservation to ensure it doesn’t change, because the port forward needs a fixed target. Now, whenever someone goes out on the internet and tries to connect to sanyal.net port 80/443, the router will funnel that traffic to the Ubuntu box. Without this, the connection would be refused or end up at the router’s admin interface (which we don’t want exposed). I only opened 80 and 443. Everything else (SSH, database ports, etc.) remains closed off from the outside. This minimizes security risks.
It’s worth noting that port 80 (HTTP) is technically optional if you’re serving everything via HTTPS. I still forward 80 because Traefik uses it for Let’s Encrypt HTTP-01 challenges and to redirect any HTTP requests to HTTPS. But all actual content is delivered on 443 with TLS. If I had chosen to use a DNS challenge or didn’t care about redirecting, I could omit 80. However, forwarding both is standard for a web server setup, and it allows the convenience of “http://” URLs upgrading to “https://”.
The process to set up port forwarding differs by router, but generally, I logged into the router’s admin page, found the NAT/Port Forwarding section, and added new rules. I specified external port 80 -> internal IP 192.168.1.50 port 80 (TCP), and similarly for 443. I also made sure the router itself wasn’t using those ports (some routers have remote admin on 80/443 – I turned that off to avoid conflict). After saving, I tested it by using a port checking tool externally and by trying to access a service from my phone over cellular (to simulate an outside connection). It worked – the requests hit Traefik as expected.
One more thing I did was set up Dynamic DNS on the router itself, but pointing to No-IP. Wait, didn’t I already do that with the client on Ubuntu? Yes, I did. The router had an option for dynamic DNS, but interestingly, it didn’t support No-IP, so that’s why I use the client. If your router supports your DDNS provider, you could have the router handle IP updates and skip the client. The key is that either the router or an internal device regularly updates the DDNS. I mention this as an alternative path.
With port forwarding in place, the homelab is essentially “online”. From any internet connection, I can type one of my service URLs and reach the respective application. The chain is: DNS name -> resolves to home IP (thanks to No-IP) -> router sees request on port 443 -> forwards to Ubuntu box -> Traefik receives it -> routes to container -> container serves content. We’ve successfully covered that entire chain now. 🙌
Security tip: I ensured that my router’s firmware is updated and that default credentials are changed, etc., since I am allowing traffic through it. Also, the forwarded ports only lead to Traefik, which is pretty hardened and only speaks HTTP/HTTPS. Internally, I keep my firewall (ufw) on Ubuntu configured to allow 80/443 from the router and maybe SSH from the LAN, but not much else. Essentially, the stance is “only let in what is necessary.” This aligns with the advice “Only forward the ports that you absolutely need”,. I’ve also tested that if I try to hit a random port (like 8080) on my WAN, nothing happens, which is good.
Alright! At this stage, we’ve covered the platform (hardware/OS), the containerization approach (Docker + Compose), the reverse proxy (Traefik), the dynamic DNS (No-IP), and router forwarding. This forms the architecture of the homelab. Now, it’s time for the fun part: a tour of the actual services I’m hosting on this mini server. Each one has its own purpose and tech stack, demonstrating how versatile a homelab can be. 🎉
Showcasing the Hosted Services 🚀
Despite its small size, my homelab box is running a variety of applications – each in a Docker container, accessible via its own subdomain under sanyal.net. Here are the six main services currently hosted, and a bit about each one:
1. Personal Homepage – Portfolio Site (React + TypeScript) 💼
URL: https://subroto.sanyal.net
This is my personal website – essentially an online resume/portfolio and blog for myself (Subroto Sanyal). I built it as a single-page application using React and TypeScript, showcasing my projects, skills, and contact info. The site has a sleek, modern design and is fully responsive. It’s a great way for me to have a professional web presence without relying on third-party platforms.
How it runs in the homelab: I developed the React app locally and built it into static files (HTML, JS, CSS). For deployment, I use a lightweight Nginx container to serve those static files. The Docker image is Nginx with my React build output mounted. This container is hooked into Traefik with the host subroto.sanyal.net. React apps are client-side heavy, so the server’s job is just to serve the files quickly, which Nginx excels at. The memory and CPU use of this container is minimal. I allocated a few tens of MBs of RAM, and it rarely goes beyond that since it’s just serving files. It’s a testament to how efficient this setup is that a tiny PC can easily handle a React site – with caching and compression configured, it’s very snappy.
Extra goodies: I’ve done some SEO optimization on this site (server-side rendering isn’t used since it’s a static SPA, but I use meta tags and Open Graph tags for link previews). Thanks to Traefik, it’s automatically HTTPS which is good for SEO and user trust (no scary “not secure” warnings). The site is also behind Cloudflare (optional) for CDN caching when I experimented, but currently, I mostly rely on my server since the audience is small. One benefit of self-hosting my portfolio is that I can update it anytime by deploying a new Docker image – no need to deal with hosting providers or upload via FTP. Plus, I can include dynamic sections in the future if I integrate a backend (which I could containerize and add to the Compose file easily).
2. BrainBrew – Tech Blog (Ghost CMS) 📓☕️
URL: https://brainbrew.sanyal.net
BrainBrew is the name of my tech blog, where I write articles and tutorials (kind of like this one!). It runs on Ghost CMS, which is an open-source blogging platform. I chose Ghost because it’s clean, focused on publishing, and very performant. It’s often praised for being great with SEO out of the box and having a modern editor. Indeed, Ghost “comes with several features out of the box that help improve your website’s SEO, including automatic metadata, sitemaps, canonical tags, and more”ghost.orgghost.org. As a result, I don’t need to fuss with SEO plugins or heavy themes like one might on WordPress – Ghost is lean and fast by default. My blog posts on BrainBrew are primarily about software development, homelab how-tos, and project updates.
How it runs in the homelab: Ghost provides an official Docker image that includes the Node.js application. It uses an underlying database (Ghost can use SQLite by default for low-traffic instances, which is what I opted for, to keep it simple – no separate DB container needed). I run the Ghost container with a volume to persist the content (the SQLite DB and images). The container is configured with an environment variable for the site URL (http://brainbrew.sanyal.net internally, which Ghost needs to generate correct links, though Traefik gives it the external HTTPS). Traefik routes brainbrew.sanyal.net traffic to this Ghost container. Because Ghost listens on its own port internally (2368 by default), Traefik’s routing is vital.
Ghost is a bit heavier than a static site because it’s a dynamic Node.js app, but it’s well within what my hardware can handle. Memory usage for Ghost hovers maybe around 200 MB when in use, CPU is negligible unless I’m publishing something or a spike of traffic comes (which is rare in a personal blog). Since it’s just me writing, the load is mainly read-heavy, and Node+SQLite handles that fine for a small audience. If it grew, I might switch to MySQL and add a cache, but on this homelab, that’s unnecessary complexity.
I love that by self-hosting Ghost, I avoid their paid hosted service (which is great, but costs money). I get all the benefits of an SEO-optimized, beautiful blog platform without monthly fees, and my content stays on my server. Upgrading Ghost is as simple as pulling a newer Docker image occasionally – I usually do it every few months to get the latest features.
3. NutriDerm – E-commerce Demo (React + TypeScript) 🛒
URL: https://nutriderm.sanyal.net
NutriDerm is a project of mine – it’s a demo e-commerce web application for a fictional skincare products store. I built it using React and TypeScript (a ,similar stack to my portfolio, but more complex in functionality). It showcases product listings, a shopping cart, and a checkout workflow (though for demo purposes, it’s not hooked to real payments). The idea was to practice building a single-page application with state management, routing, and API integration.
For the backend, NutriDerm has a mock API (I used a JSON server and some dummy data, or sometimes I run a lightweight Node/Express server to handle form submissions). However, in the production homelab deployment, I actually prebuilt it as a static site (since most of it can run in the browser with dummy data). Alternatively, I could run a small API container alongside it if needed.
How it runs in the homelab: Similar to my portfolio site, NutriDerm’s frontend is served from an Nginx container that hosts the static files. If I include the mock API, that’s another container (maybe on some port, which Traefik can route via a subpath or subdomain, but currently I keep it simple and static). The domain nutriderm.sanyal.net is configured in Traefik to go to the NutriDerm frontend container. From the user’s perspective, it’s just a website for a store – they can browse products and add to the ,cart. If I had a backend, I might have api.nutriderm.sanyal.net for the API and have the frontend call that, but to not over-complicate, let's assume it’s mostly static/demo.
This project shows how the homelab can host even a pretend business site – useful for portfolio purposes or beta testing. Since it’s React, the performance considerations are similar to the personal homepage: mostly,, the work is done in the browser. The container just needs to efficiently serve files. With HTTP/2 and caching enabled (which Traefik and Nginx handle), it loads quickly even on modest hardware. I’ve tested NutriDerm with a handful of concurrent users (friends who I asked to poke around) and the server didn’t even blink.
One advantage of containerizing an app like this is consistency between dev and prod. I developed it on my laptop, then created a Docker image for the production build – the same image runs on the homelab. I didn’t have to manually configure Nginx on the server; it’s all baked into the container. If I update the app (say add a new feature), I rebuild the Docker image and deploy the new container via Compose, and Traefik continues routing to it seamlessly. Continuous deployment in mini form!
4. Eco-Tycoon – Browser Game (Dart + Flutter Web) 🎮
URL: https://eco-tycoon.sanyal.net
Eco-Tycoon is a fun side project: it’s a browser game that simulates managing an ecological reserve or sustainable city (like a tycoon-style game with an eco-friendly twist 🌳). What’s unique is that I built it using Flutter Web (Dart language). Flutter, primarily known for mobile apps, can also compile to WebAssembly/JavaScript, allowing Flutter apps to run in the browser. This game is a showcase of that – rich graphics and interactive UI all done with Flutter’s framework, running as a web app.
How it runs in the homelab: Flutter Web compiles the game into static web assets (an index.html, a bunch of JS files, WASM, and assets like images). Essentially, it becomes similar to a static site deployment. I serve Eco-Tycoon with, you guessed it, an Nginx container hosting those files. Traefik routes eco-tycoon.sanyal.net traffic to that container. The game being a heavier payload (since Flutter outputs a fairly large JS bundle) means the initial load is a bit bigger than a typical site, but after that, it’s mostly client-side execution. My server just needs to deliver those files once; after that, the game runs in the user’s browser, communicating only if needed for high scores or such (currently, it’s mostly self-contained).
Running a game server could be more demanding, but here the server is static. If I ever incorporate multiplayer or cloud save features, I might add a small backend service. But that would also be dockerized and Traefik’d, which I’m confident the homelab could handle as long as usage is moderate.
This service demonstrates the versatility of the homelab: it’s not just blogs and forms, but even a game can be hosted. And it’s impressive that a $<100 mini PC can deliver a playable game experience to users across the net. The key is that heavy lifting (the game’s logic and rendering) is done client-side, so the server is fine.
Eco-Tycoon does benefit from being on HTTPS (via Traefik) because browsers often require a secure context for things like service workers or certain APIs that the game might use. With Traefik, I didn’t have to worry – it was automatically served securely. I also set up HTTP caching for the game files so returning players don’t redownload everything each time (again, standard stuff Nginx does by sending correct headers, which I ensured in the container config).
5. ALS Campaign – Interactive Slide Deck (JavaScript) 🎤
URL: https://als.sanyal.net
ALS Campaign is an interactive slide deck/presentation I built for an awareness campaign (ALS stands for Amyotrophic Lateral Sclerosis, often known through the Ice Bucket Challenge – this was a hypothetical campaign strategy I developed). The slide deck is essentially a fancy slideshow that runs in the browser with animations, charts, and embedded media. I built it with plain HTML/JavaScript/CSS, using a library (Reveal.js) to handle slide transitions and perhaps Chart.js for graphs. It’s not just static slides but has interactive elements (like a mini quiz or dynamic content to engage viewers).
How it runs in the homelab: Since it’s basically a web page, I again serve this via a container. The content is static files, so an Nginx (or even a simple Node static server) container is fine. The domain als.sanyal.net points to this container through Traefik. This was actually one of the first things I hosted on the homelab because it was a single HTML file plus assets, and I wanted a quick way to share it with colleagues without using Google Slides or similar. Dropping it into Docker and deploying took maybe 10 minutes – a big win for efficiency.
The slide deck being self-contained means there’s not much resource usage. Even if a hundred people viewed it simultaneously, it’s just serving static files, which my homelab can easily do (the bottleneck might be my upload bandwidth, but for mostly text and images, it’s fine). I optimized the images and preloaded some stuff to ensure it runs smoothly. Being on my domain with HTTPS also allowed me to, for instance, use geolocation or camera in slides (if I had those demos) since browsers require secure contexts for such features. Hosting it myself also means I could keep it internal if needed (for example, restrict by not exposing the domain publicly), but in this case, it’s public.
The ALS Campaign deck illustrates how even ephemeral projects or presentations can be hosted elegantly on a homelab. Instead of sending a huge PowerPoint file around, I just send a link. And because I control the hosting, I can update the content anytime (fix a typo or tweak a slide) and it’s immediately reflected for everyone. It feels more professional, too.
6. Private Cloud – Nextcloud Storage 📁☁️
URL: https://storage.sanyal.net
This service is my personal cloud storage and file syncing platform, powered by Nextcloud. Nextcloud is an open-source alternative to services like Dropbox, Google Drive, or OneDrive. It lets me upload and download files, sync them across devices, share with others, and even use add-ons like calendar, contacts, tasks, notes, etc. Essentially, it’s my self-hosted Google Drive – all my files (documents, photos, etc.) are stored on my homelab and I can access them from anywhere. Nextcloud emphasizes privacy and security; as their site says, “Store your documents, calendar, contacts, and photos securely on your server… With self-hosted cloud storage, your data is where you want it to be: at home or in the cloud you trust.”nextcloud.com. This aligns perfectly with why I set up a homelab – my data, on my machines.
How it runs in the homelab: Nextcloud is a PHP application, typically run with an Apache or Nginx web server and a MySQL/MariaDB database (plus optional Redis for caching). I use the official Nextcloud Docker image (which includes Apache and PHP) and a separate MariaDB container as the database. In my docker-compose.yml, I have a nextcloud service and a db service. The database container is on the internal network and not exposed externally, of course. The Nextcloud container connects to it for storing metadata and file indices. All the actual files I store are on a Docker volume mounted into the Nextcloud container (so they reside on the server’s SSD). I also have a volume for the database data. This ensures persistence.
Traefik is configured to route storage.sanyal.net to the Nextcloud container. I also have additional Traefik middleware for this service: Nextcloud benefits from some special headers (to enforce HTTPS, HSTS, etc.), which I set via Traefik labels. So when I access https://storage.sanyal.net, I get the Nextcloud web interface, fully encrypted. Nextcloud uses WebDAV under the hood for sync, which also goes through Traefik (still just HTTP traffic, nothing special needed beyond the correct headers which Traefik passes).
Running Nextcloud is the most resource-intensive of my services, understandably. When I upload or download large files, it uses CPU and disk I/O, and the PHP process can use memory. I’ve allocated PHP memory appropriately and occasionally watch the usage. 8 GB RAM on the system is enough that even with Nextcloud and everything else, there’s headroom (Nextcloud might use a few hundred MB, plus MariaDB, maybe 100MB for cache). I did a few optimizations: enabled PHP OPcache, set up cron (as a cron container or host cron job hitting the webcron endpoint) for background tasks, and enabled Nextcloud’s caching for assets. I haven’t added Redis yet (for file locking, caching), but that’s on my list if needed – that would be yet another small container. This demonstrates how containers make it easy to add components: if Nextcloud needs Redis, I’d just add a Redis service in compose and configure Nextcloud to use it. No apt-get fuss on the host.
With Nextcloud, I effectively have my private cloud. I use it to sync important files between my desktop and laptop, auto-upload photos from my phone (there’s a Nextcloud mobile app that syncs my camera roll when on Wi-Fi), and share files via link when I need to send someone something large. It feels great knowing these files sit on my server in my house, not on some company’s server. I do periodically back up the Nextcloud data to an external drive, because homelab or not, one copy of data isn’t enough – but I digress. The point is, Nextcloud is an exemplar of the homelab philosophy: “Because you care about privacy. It is nobody’s business what you do… your own, private Nextcloud server is the best way to get started with getting it back!”nextcloud.com. Hosting Nextcloud has been one of the most rewarding parts of this setup. It replaces a bunch of cloud services with one solution under my control.
General Note on Services:
All these services coexist on the homelab peacefully. Docker Compose and Traefik make sure they don’t conflict on ports and that each has its fair share of resources. When one service is busy (say I’m syncing a lot of files on Nextcloud), the others are still reachable and responsive. Linux does a good job scheduling the CPU, and I/O is perhaps the only contention point if multiple things happen at once, but given the typical use patterns, it’s been fine.
I also have monitoring set up (using something like Portainer for containers, or Netdata for system metrics – those are optional services I sometimes run to keep an eye on the system health). They help me ensure the load isn’t too high. So far, the little machine is handling everything like a champ 💪.
Now that we’ve toured what’s running, let’s wrap up by reflecting on the project and what it means for DIY enthusiasts.
Conclusion 🎉
Building this homelab has been an incredible journey – turning a tiny Linux box into a multi-service server stack has taught me so much about modern web deployment, networking, and system design. And the best part is, it’s my cloud, under my roof! ☁️🏠 With just 8 GB of RAM and an Intel 4-core CPU, I’m hosting a portfolio site, a blog, a web store demo, a browser game, an interactive presentation, and a full-fledged cloud storage platform. The fact that all this runs concurrently on a device smaller than a hardcover book still amazes me.
Let’s quickly recap the key ingredients that made this possible:
- Docker & Containers: By containerizing each application, I achieved clean isolation and easy management of diverse tech stacks. The consistency (“includes everything required to run an application” in one package) means deployments rarely have “it works on my machine” issues. It’s like magic how I can pull images and stand-up services in minutes.
- Docker Compose: The hero orchestrator that ties it all together. One YAML file defines my entire setup – a living document of my homelab. This not only simplifies bringing everything up or down, but also provides documentation of how things link. Compose gave me default networking and volumes, reducing manual config and errors. I wholeheartedly recommend Compose for any homelab with multiple containers; it’s a gentle introduction to infrastructure-as-code and pays off in reliability.
- Traefik Reverse Proxy: The glue on the networking side – Traefik allowed all services to share ports 80/443 and gave each one a pretty URL. Its automatic cert management saved me from dealing with SSL certificates manually (it’s delightful seeing the log “Got Let’s Encrypt certificate for brainbrew.sanyal.net” on first run). Traefik’s Docker integration meant that as soon as I defined new containers with proper labels, they were online. Plus, I can sleep soundly knowing all external traffic is encrypted and routed correctly.
- No-IP Dynamic DNS: This service has been the unsung workhorse, keeping my domain reachable. The Dynamic Update Client quietly runs and “updates the hostname with the current IP address” whenever needed. Because of that, I can use a custom domain for a homelab on a consumer ISP, which is awesome. Every time my ISP changes my IP, No-IP bridges the gap within minutes, so none of my service URLs break.
- Router Port Forwarding: By forwarding just ports 80 and 443, I essentially published my mini-server to the world in a controlled manner. The rest of my network remains private. The router config was minimal – a one-time setup – and now everything flows through to the homelab box. It’s a simple setup, but it underpins the whole operation by linking the outside world to my internal Traefik proxy.
- Planning for Security & Maintenance: While not explicitly requested, it’s worth noting: I keep security in mind by using strong passwords, updating containers (Ghost, Nextcloud, etc.) regularly, and monitoring logs. Traefik, for instance, I keep updated to get the latest security fixes. The system has a firewall (only allowing needed ports). And I periodically check that my data (especially Nextcloud) is backed up. Homelabbing is fun, but you should still act as the sysadmin and be responsible about updates and backups. Thankfully, Docker makes updates easy (just pull new images and restart) and backups straightforward (since data is in volumes or specific directories).
On the philosophy side, this project reinforced why self-hosting is so rewarding. I have learned a ton – from troubleshooting Docker networking to tuning Linux for swap, from DNS nuances to content caching strategies. It’s one thing to read about these concepts, but running your server makes you truly understand them. And it’s been fun every step of the way. There’s a certain joy in typing your URL into a browser from miles away and seeing your home server respond with your content. It’s like being in two places at once – you feel a personal connection to the infrastructure.
Moreover, I enjoy the freedom and control it gives me. I’m not locked into any single vendor’s ecosystem. If I want to try a new open-source app (say, a photo gallery or a password manager), I can deploy it on my homelab and see if it fits my needs. I can customize things deeply – for instance, I tweaked my Nextcloud theming and config without any hoster-imposed limitations. My data (blog posts, files, etc.) lives on hardware I own. As the saying goes, “privacy is a right” and running your own services is a tangible way to exercise that.
For anyone reading this who’s intrigued by building something similar: do it! 🎉 You don’t need to start with as many services as I have. Maybe begin with one web app or a personal wiki, containerize it, proxy it, and grow from there. The barrier to entry is lower than ever – a second-hand mini PC or even a Raspberry Pi, some free software, and a weekend of tinkering can get you started. The homelab community is huge, and there are tons of resources and friendly folks out there (I learned a lot from forums, documentation, and examples). Remember, as I demonstrated, even if you don’t have a static IP, dynamic DNS services like No-IP have got you covered, and projects like Traefik simplify the once-daunting networking parts.
To wrap up, my palm-sized homelab is a proof-of-concept that big things can come in small packages. With Docker 🐳 as the engine, Traefik as the steering wheel, and a bit of networking pixie dust, a mini PC can host an entire suite of applications reliably. Every time I see those containers humming along and serving content globally, I’m hit with a mix of pride and astonishment. It’s a personal cloud that I built, maintain, and use daily – and there’s something profoundly satisfying about that.
Thanks for reading this extensive deep dive! I hope it was both informative and engaging (I tried to keep it light with some emojis and stories 😅). If you’re a tech-savvy reader considering a homelab, I say go for it – there’s no better way to level up your skills and gain digital independence. And who knows, maybe soon you’ll be writing about your mini-server empire. Happy homelabbing! 🚀🏡💻